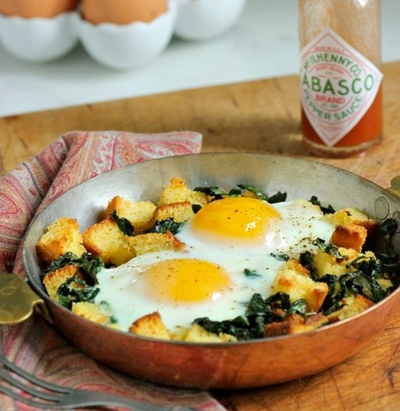
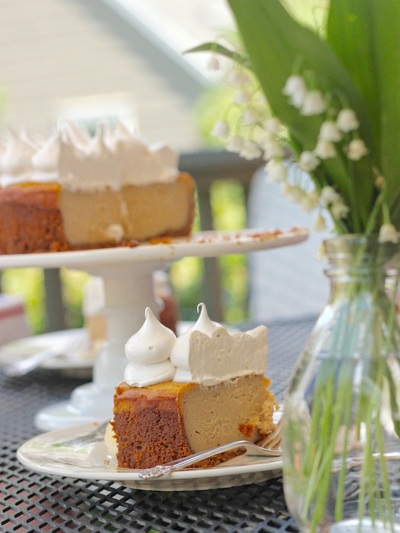
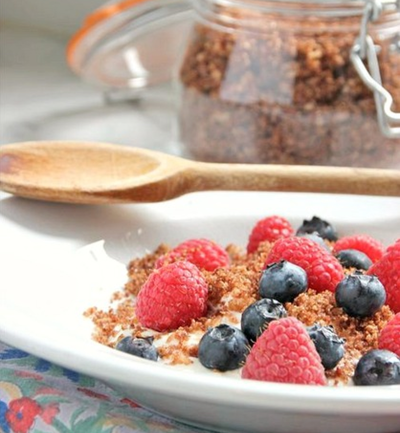
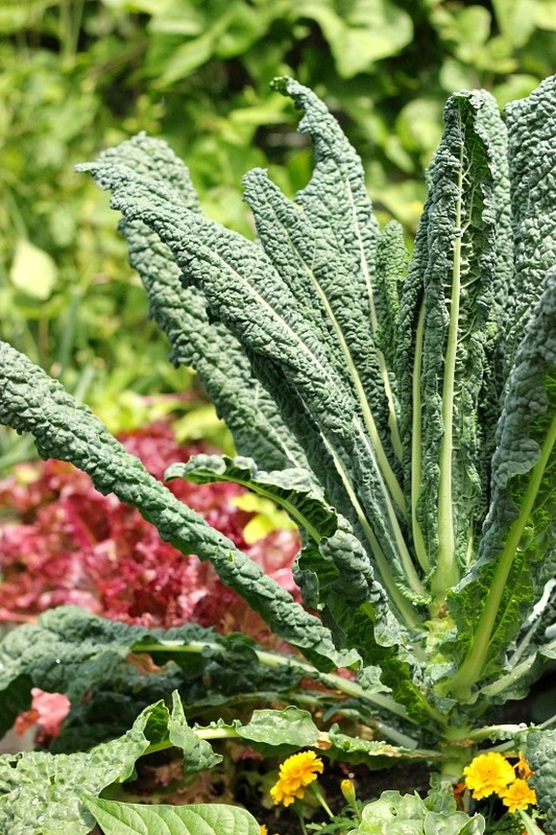
 This Kale, Potato, and Fresh Ricotta Frittata has been on the menu often at my house over the past few weeks... And no apologies to all who have had to eat it so many times (mainly my husband). I always start baking this frittata when the lacinato kale is ready in my garden. I rarely purchase kale, beets and radishes during the winter months. They are savored more when eaten only during my kitchen garden's growing season. This means we consume a huge amount of these vegetables during June, July, and August. 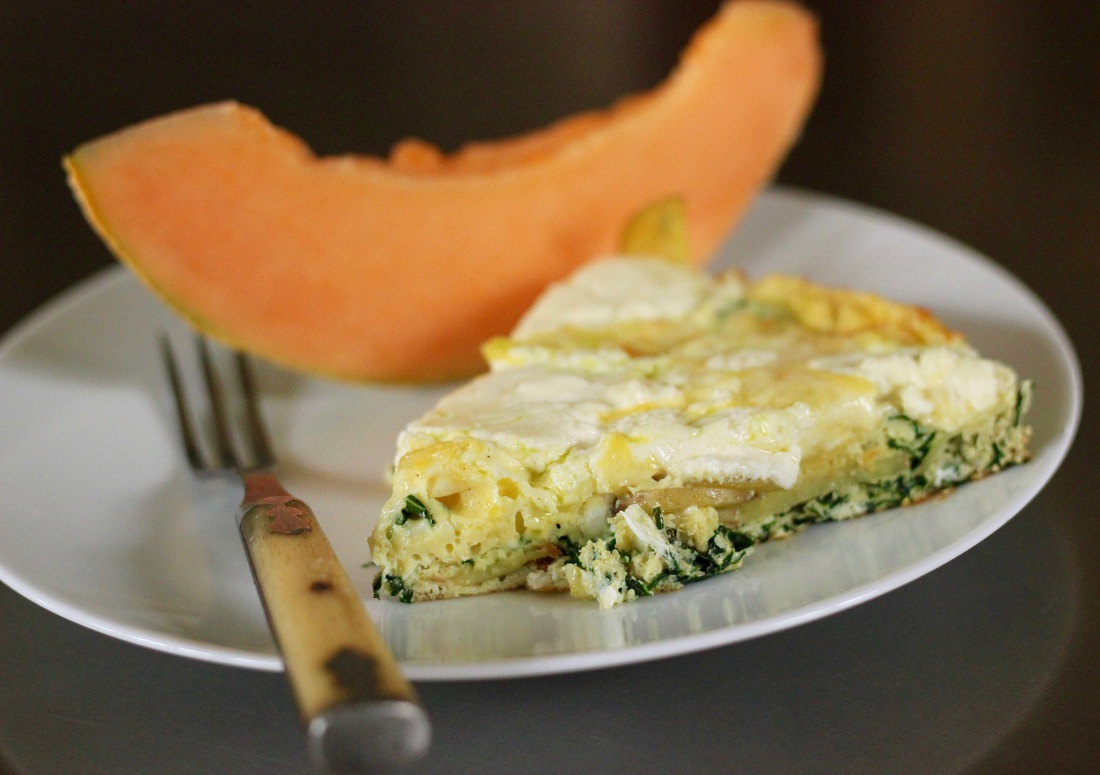 We are big egg eaters at my house and frittatas are such a great way to make eggs a meal any time of the day. And, to clean out the refrigerator! If I've made roasted potatoes or a french potato salad the day before, they will most likely end up in a frittata the next morning; the same with any other leftover vegetables. I also try to have fresh ricotta (recipe HERE) available at all times. I am so in love with it and drop dollops of the ricotta all over the top of a frittata before baking. Add what you love to your frittata; the only constant is eight gently whisked eggs. A 10-inch cast iron skillet I inherited is what I always use; probably my favorite and the most-used kitchen implement I have. 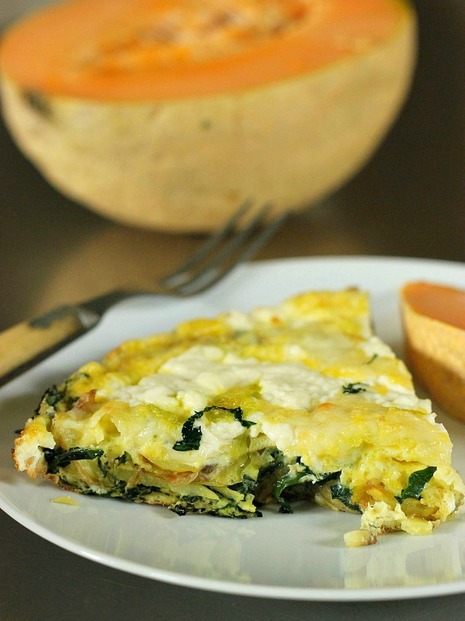  • 4 small Yukon Gold potatoes, thinly sliced • 5 lacinato kale leaves, ribs removed and thinly sliced • Extra-virgin olive oil • Kosher salt and freshly ground black pepper • 1-1 1/2 cups grated Gruyère cheese • 8 organic, large eggs, whisked • Fresh ricotta (recipe HERE) 1. Preheat oven to 375˚F. 2. In a 10-inch, non-stick oven-proof skillet, pour a generous drizzle of olive oil over medium heat. Add the sliced potatoes. Use a thin spatula to turn the potatoes until light golden in color. Add the kale and add a bit more olive oil if needed. Season with salt and pepper and continue to turn the potatoes and kale until the potatoes are a golden brown and the kale has wilted. Reduce the burner to low and sprinkle the grated cheese evenly over the top of the potatoes and kale. Slowly pour the whisked eggs over the mixture and sprinkle with additional salt and pepper. Take off heat. Top with big dollops of fresh ricotta. (I probably used close to half a pound.) 3. Place the skillet on the middle rack of oven and bake for 25 to 30 minutes, or until the the eggs are set. Eat the frittata straight from the oven or at room temperature. Enjoy! TAKE a LOOK:
0 Comments
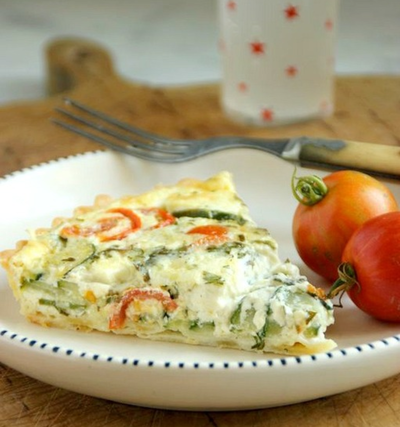
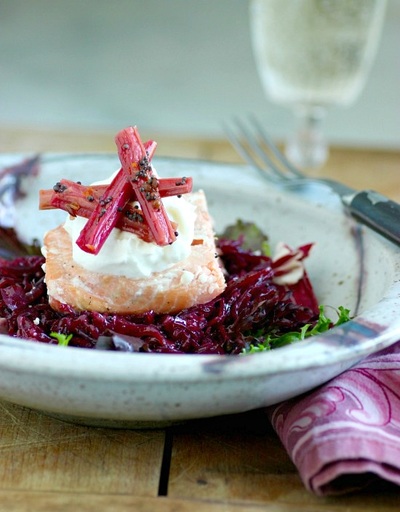
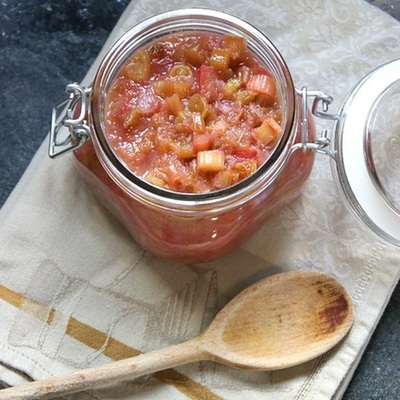
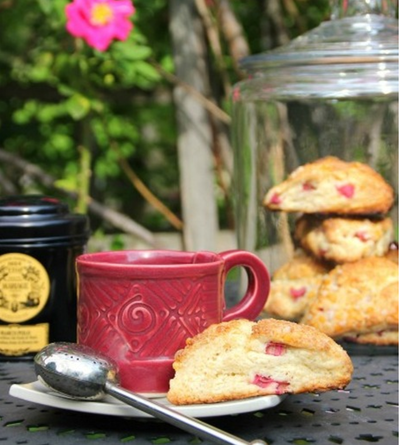
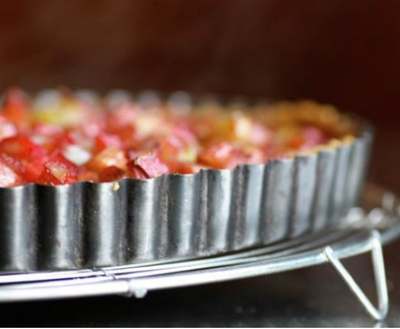
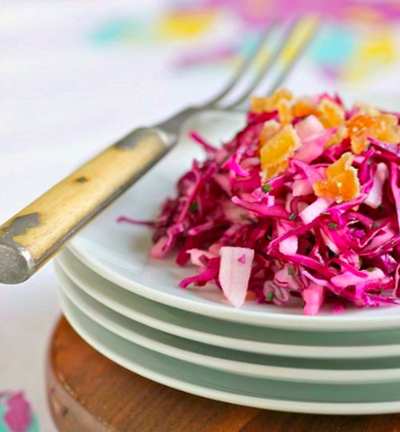
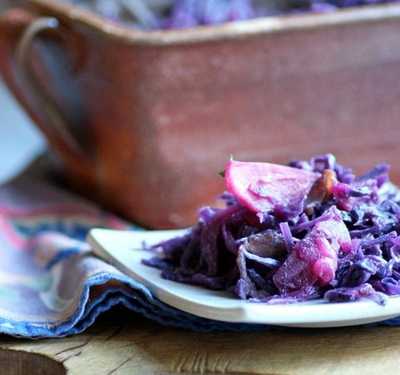
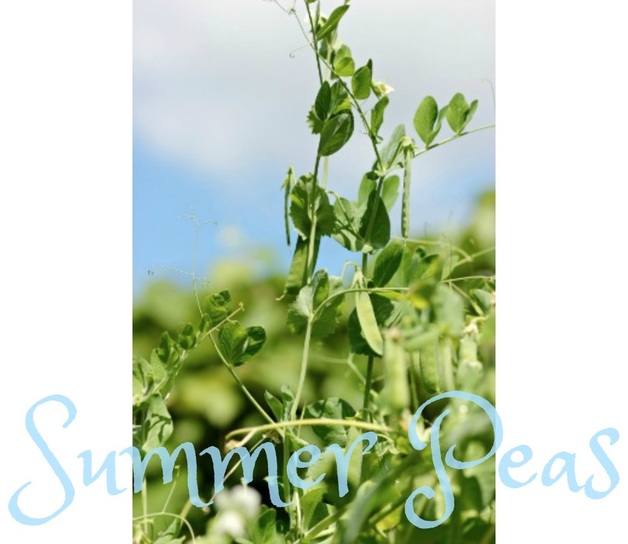 It's been a glorious summer so far. There have been few days when it is so hot, I question whether I should be in my kitchen baking. That's not the case at all this year. I've been able to bake like crazy. The dew point, much of the time, would even allow meringues! My kitchen has produced many sweet and savory tarts, and one of my favorite has been this Pea and Salmon Tart that made use of freshly picked peas from my garden. For me, there is just nothing better than walking out back and picking dinner. 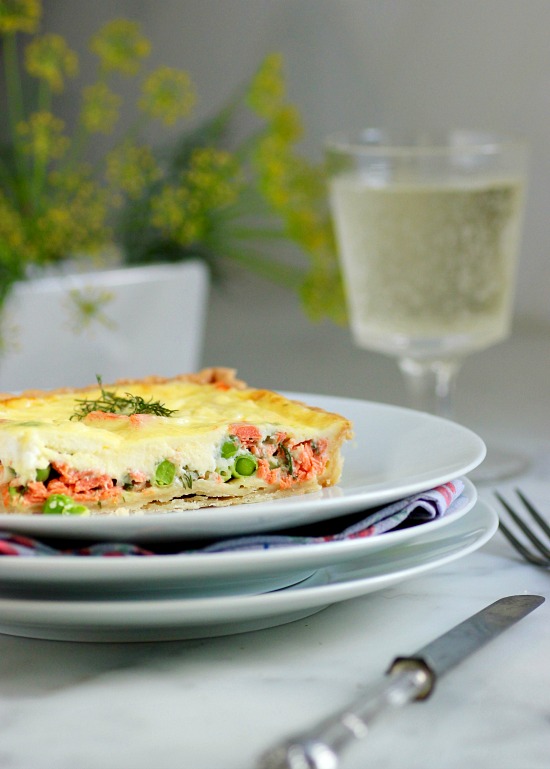 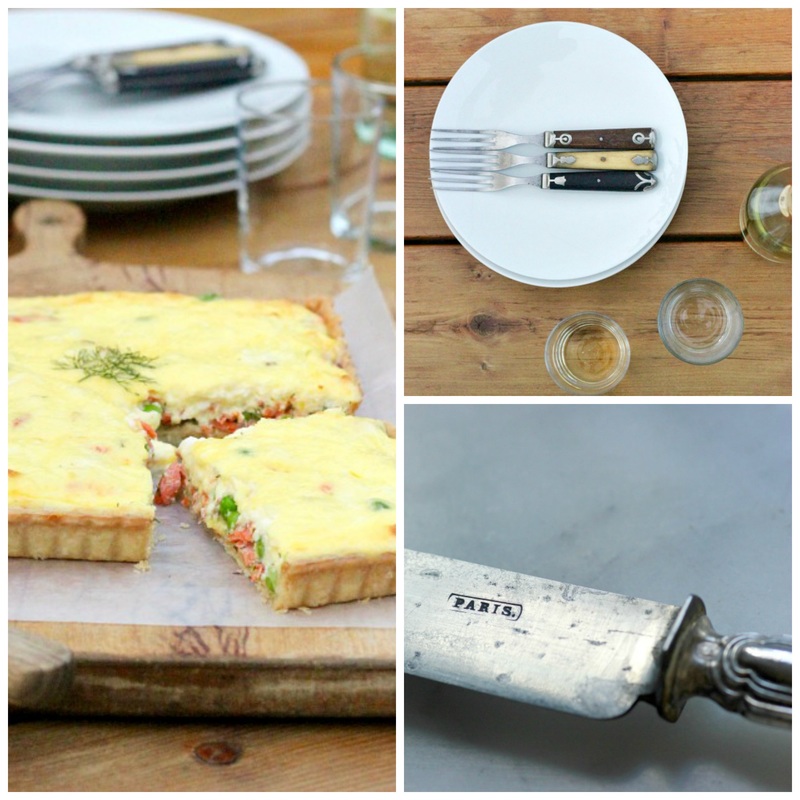 We have been eating every evening meal alfresco. Until a couple of nights ago, we weren't even bothered by Minnesota mosquitoes. Ideal conditions! 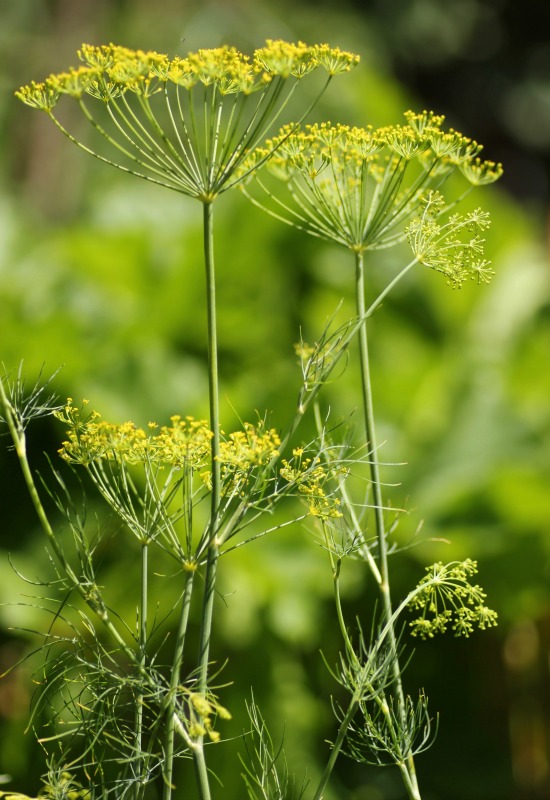 Fresh dill from my herb garden, above. Hydrangea, below, also from my backyard gardens.  This is the first time in many years that we have been home in Saint Paul over the 4th of July holiday. As my husband knows, I really dislike going anywhere during the summer months. I wait all winter... long Minnesota winters... for my kitchen garden. And to leave just when the haricot verts are ready to pick turns me into quite the curmudgeon. 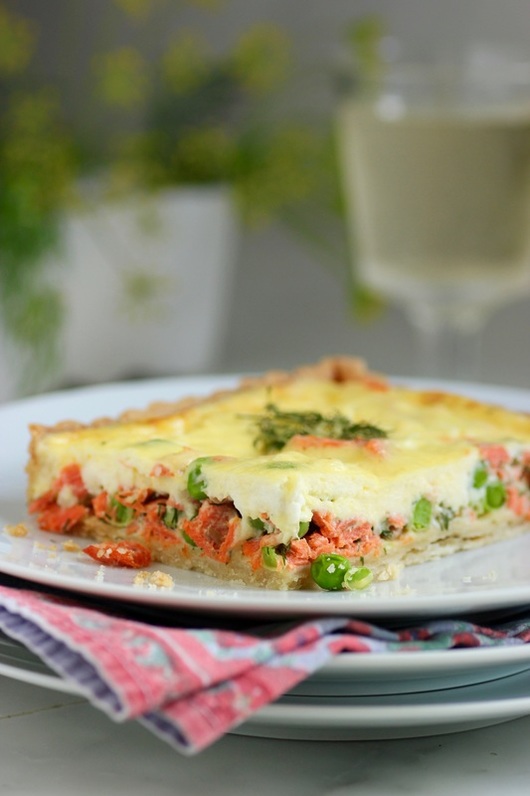  PASTRY • 1 1/2 cups unbleached, all-purpose flour • 1/2 teaspoon kosher salt • 8 tablespoons cold, unsalted butter, cut into 1/2-inch cubes • 4 tablespoons ice water • extra flour for rolling pastry FILLING • 1/2 cup fresh garden peas • 1 poached, baked, or grilled wild salmon fillet, skin removed, and cut into pieces • grated zest of 1 lemon • 2 tablespoons chopped fresh dill • 1 tablespoon finely chopped shallot • 4 large eggs • 1 cup fresh ricotta • 1/4 cup heavy cream • 1/4 cup freshly grated Parmesan • Salt and freshly ground black pepper 1. Pulse 1 1/2 cups unbleached, all-purpose flour and salt in a food processor. Add butter; pulse until pea-size lumps form. Drizzle 3 tablespoons ice water over the mixture. Pulse until moist clumps form, adding more ice water by drips if dry. Gather dough into a ball and flatten into a disk. Wrap in plastic; chill 2 hours or overnight. 2. Roll out dough on a lightly floured surface. Transfer to a round or square tart pan (I used a 10-inch-by-10-inch pan); gently press onto bottom and up sides of the tart pan. Wrap in plastic and freeze while preheating oven to 400˚F. 3. Line dough with foil; fill with dried beans or pie weights. Bake for 17 minutes. Remove foil and beans. Return to oven and bake until crust is golden. Remove crust and reduce oven temperature to 375˚F. 4. In a medium bowl, gently mix together the peas, salmon, lemon zest, dill and shallot. Transfer the mixture to the tart crust and distribute evenly over the crust. In another bowl, whisk the eggs to break up. Add the fresh ricotta, heavy cream, Parmesan and salt and pepper to taste; whisk to combine. Pour evenly over the peas and salmon. 5. Place the tart on the middle rack of the oven and bake until set, about 25 minutes. Serve warm. TAKE a LOOK: 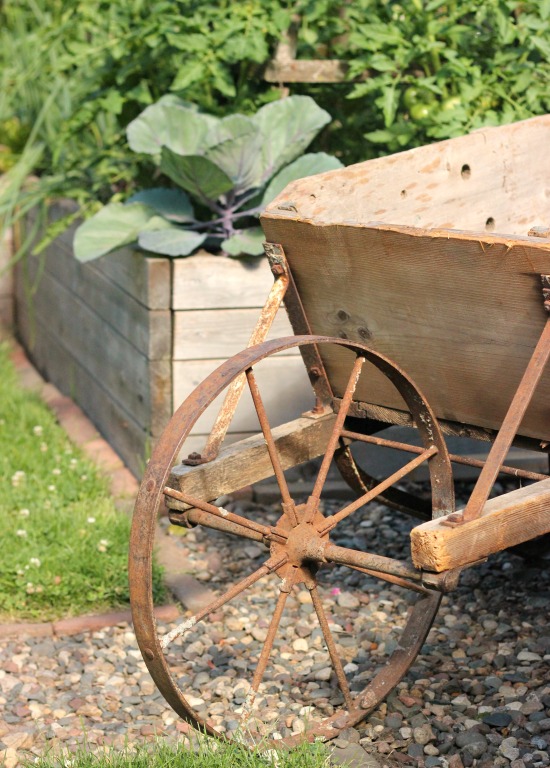 We've been eating lettuces and kale from our garden, and today I will pick English peas for the first time. If I gather enough peas, we'll be dining on a Pea and Prosciutto Risotto tonight! 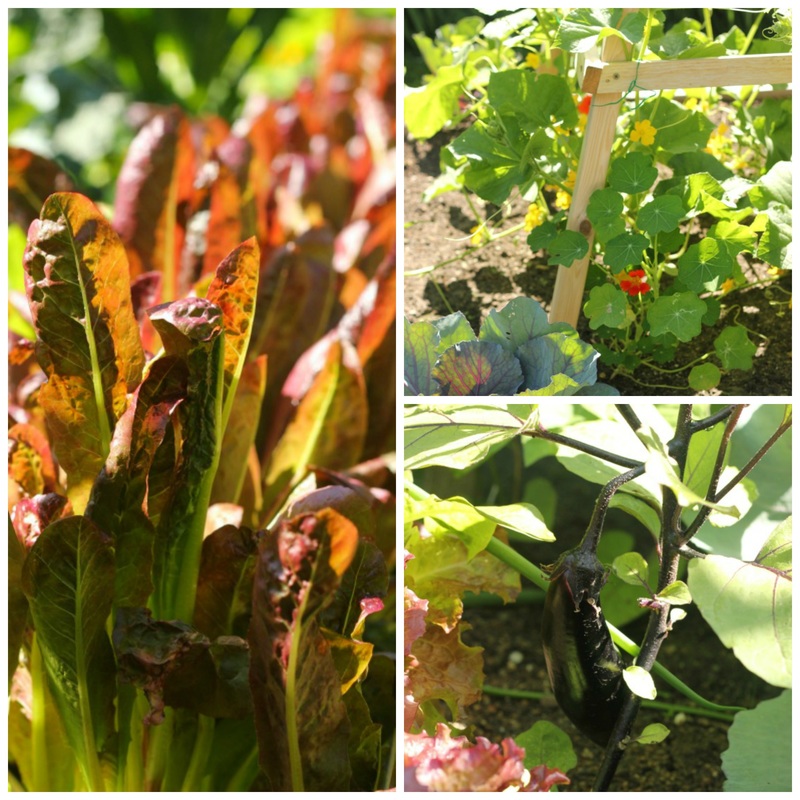 All of the lettuces in my garden are French. The upper right photo is my bed of cucumbers and edible nasturtiums. I have three Italian heirloom varieties of eggplant.  Plantings in my two herb gardens this year include chives, parsley, sage, tarragon, dill, basil and cilantro. I also have sorrel this year and will pair that with salmon this weekend. 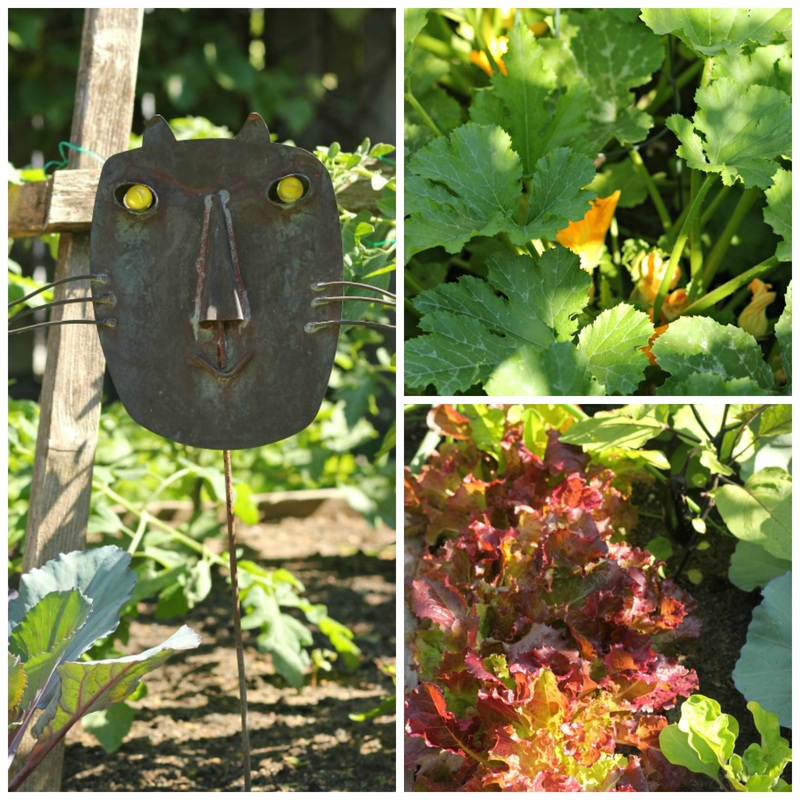 Judging by the number of squash flowers on my three plants, I predict many loaves of zucchini bread this summer! 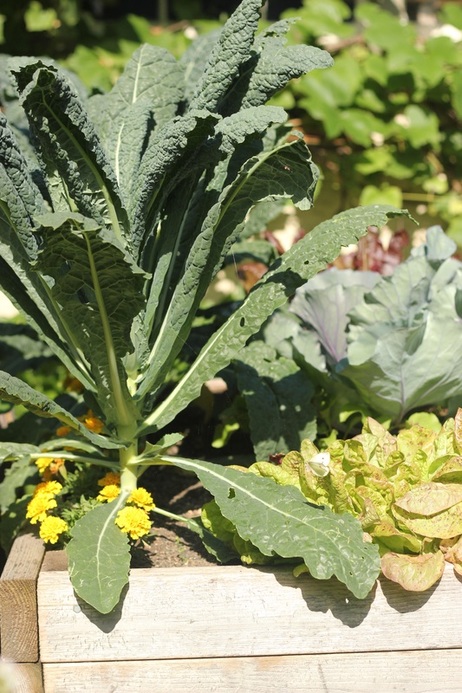  University of Minnesota Edelweiss Grapes climbing along our garage. I wonder if my husband will be attempting wine this fall. Two years ago the bottom of his glass carboy bottle, holding the wine, broke. You can imagine what our basement smelled like for days... Apparently, there was a bubble in the blown glass bottle. What a disappointment. 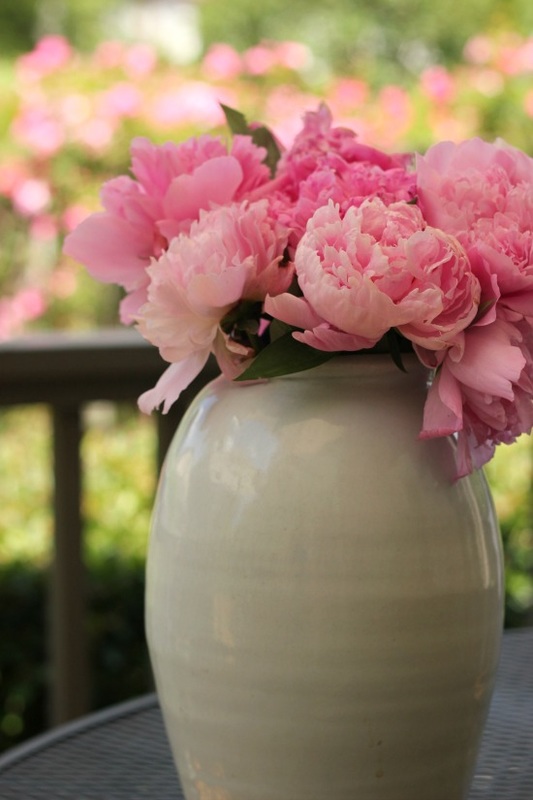 Peonies from plants given to me by my mother many years ago. They grew in her garden in Amana, Iowa, and now grow in mine. 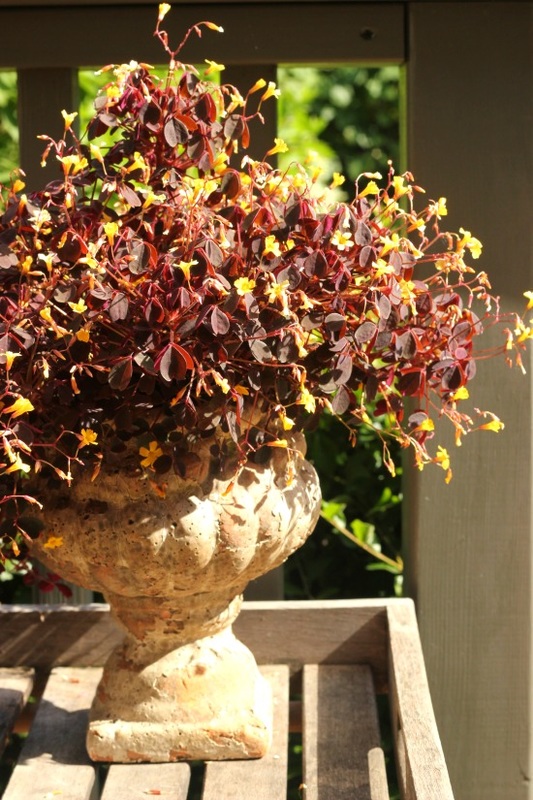 Molten Lava Oxalis... I purchase this plant every spring. I just love it in this clay pot.  And of course, a Bisous update. He is now over 7 months old and would chase his frisbee the entire day... if I would toss it for him the entire day. Nope... not doing that! TAKE a LOOK: 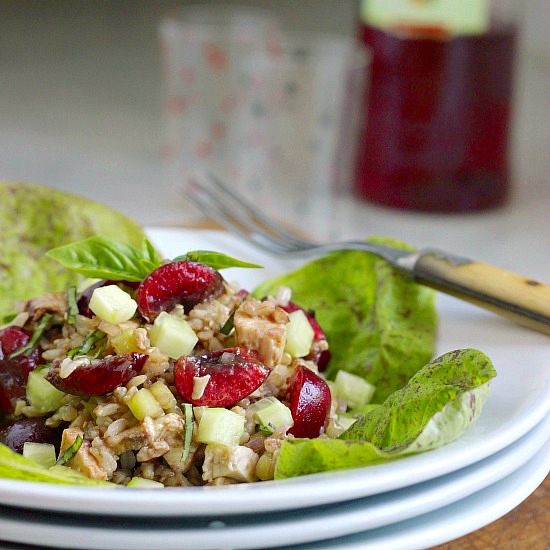 This salad is becoming a summertime staple at my house. Perfect for the hot days we are experiencing this weekend. So glad it's cherry season! + Brown Rice Salad with Cherries and Chicken + • recipe from Whole Foods Market • 3/4 cup basmati rice, rinsed • 1 1/2 teaspoons fine sea salt • 2 tablespoons extra-virgin olive oil • 2 tablespoons balsamic vinegar • 1 shallot, finely chopped • 1/2 teaspoon freshly ground black pepper • 1 pound cherries, pitted and quartered • 1 pound prepared grilled or roasted chicken breasts, diced (about 3 1/2 cups) • 2 cucumbers, peeled and diced • 1/2 small red onion, thinly sliced • 1/2 cup pecan halves, toasted and chopped • 1/2 cup finely sliced basil leaves 1. Bring 2 1/2 cups water to a boil in a small saucepan and stir in rice and 3/4 teaspoon of the salt. Bring back to a boil, stir again, cover and simmer until the rice is just tender but not mushy, about 40 minutes (not all the water will be absorbed). Drain rice and rinse briefly under cold water. Drain again. 2. Meanwhile, in a large bowl, whisk together oil, vinegar, shallot, pepper and remaining 3/4 teaspoon salt. Add cherries, chicken, cucumbers and onion; toss. Add rice and pecans and toss again. Serve at room temperature garnished with basil. TAKE a LOOK: 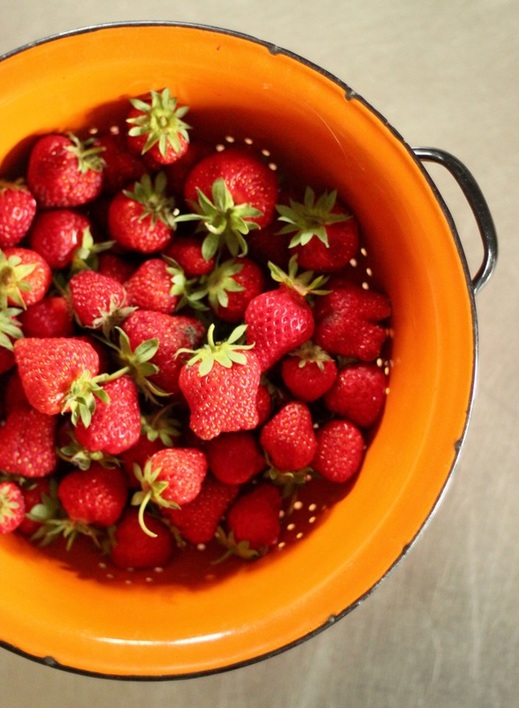 This is the first time since strawberries were planted in our garden, that I have actually had enough to do something with. They were originally planted in one of the brick-edged garden beds; not a good idea because, of course, strawberry plants like to spread. Plus, they seemed to languish there, barely producing more than a handful of fruit each season. So last spring, I dug them up and moved them to the back of our yard along the fence. They are very happy there. The strawberries are thriving and giving me a bowlful daily! 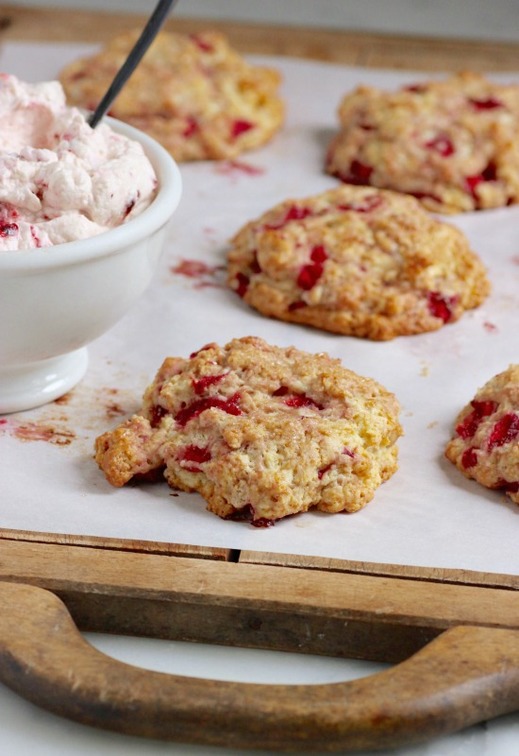 When I ran across this recipe for Strawberry Crème Fraîche Biscuits by Abigail Quinn, I knew that some of my garden strawberries would be baked into biscuits. 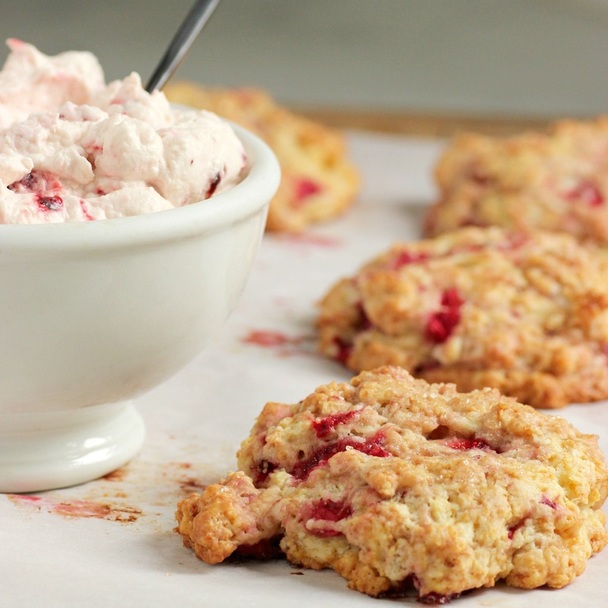 Both the biscuits and the strawberry whipped cream are full of tangy crème fraîche; a taste that always seems, for me, to conjure up thoughts of France. 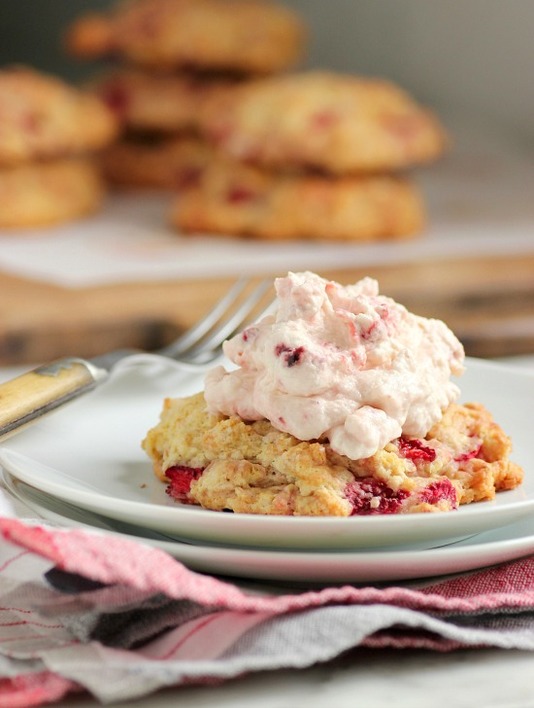 Another plus for this strawberry biscuit -- it was still delicious the second day. Usually, baked goods such as this are best eaten the day they are baked (and I would still suggest that.). But with the recipe making 12 strawberry biscuits and a good amount of the whipped crème fraîche, they've been around a while. We are now into day 3 of eating the Strawberry Crème Fraîche Biscuits for dessert and breakfast, and I can't say that they are no longer good. The biscuits still have a nice, tender crumb. I'm very impressed! The only thing I did differently with this recipe, was to sprinkle the tops of the biscuits with turbinado sugar before baking. Not necessary, but I really like that little crisp crunch. 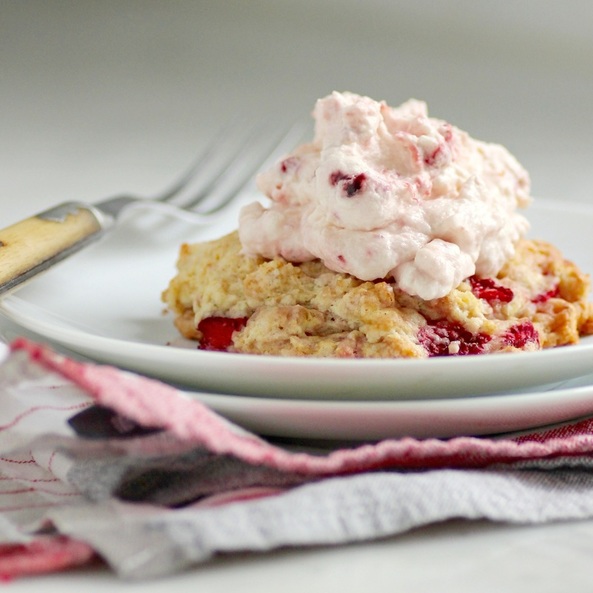  Serves 12 • adapted recipe of Abigail Quinn STRAWBERRY SWIRL • 1 cup diced strawberries • 2 tablespoons sugar • 2 teaspoons lemon juice BISCUITS • 2 1/2 cups all-purpose flour • 5 tablespoons sugar • 2 1/2 teaspoons baking powder • 1/2 teaspoon baking soda • 1/4 teaspoon kosher salt • 10 tablespoons cold, unsalted butter, cut into 1/2-inch cubes • 1/2 cup crème fraîche, homemade (recipe HERE), or purchased • 1 large egg • 1/4 cup buttermilk • 1/4 teaspoon pure vanilla extract • 1 cup diced strawberries • Turbinado sugar, for sprinkling, optional WHIPPED CREME FRAICHE • 3/4 cup crème fraîche • 1/2 cup heavy cream • 2 tablespoons sugar • 1/2 teaspoon pure vanilla extract • 1/8 teaspoon kosher salt 1. Make the Strawberry Swirl: In a small saucepan cook the strawberries with the sugar and lemon juice over moderate heat until the berries break down and the juices thicken, about 12 minutes. Let cool completely. 2. Make the Biscuits: Preheat the oven to 350˚F. Line 2 baking sheets with parchment paper. In a medium bowl, whisk the crème fraîche with the egg, buttermilk and vanilla; set aside. In the bowl of a food processor, pulse the flour with the sugar, baking powder, baking soda and salt. Add the cold, cubed butter and pulse until the butter is pea-size pieces. Pour the dry ingredients into the reserved wet ingredients and using a wooden spoon, stir the mixture until a dough just comes together. Fold in the diced strawberries, being careful not to overmix. 3. Scoop twelve 1/4-cup mounds of the biscuit dough onto the prepared baking sheets, about 3 inches apart. Sprinkle tops of biscuit mounds with turbinado sugar. Bake the biscuits for about 30 minutes, until browned; shifting the pans from top to bottom and front to back halfway through baking. Transfer the biscuits to a rack and let cool slightly. 4. Make the Whipped Crème Fraîche: Using a hand or stand mixer, whip the crème fraîche with the cream, sugar, vanilla and salt at moderate speed until medium peaks form. Fold in the cooled strawberry swirl until just combined. Serve with the warm biscuits. MAKE AHEAD: The strawberry swirl can be refrigerated for 3 days. Fold into the whipped crème fraîche before serving. TAKE a LOOK: 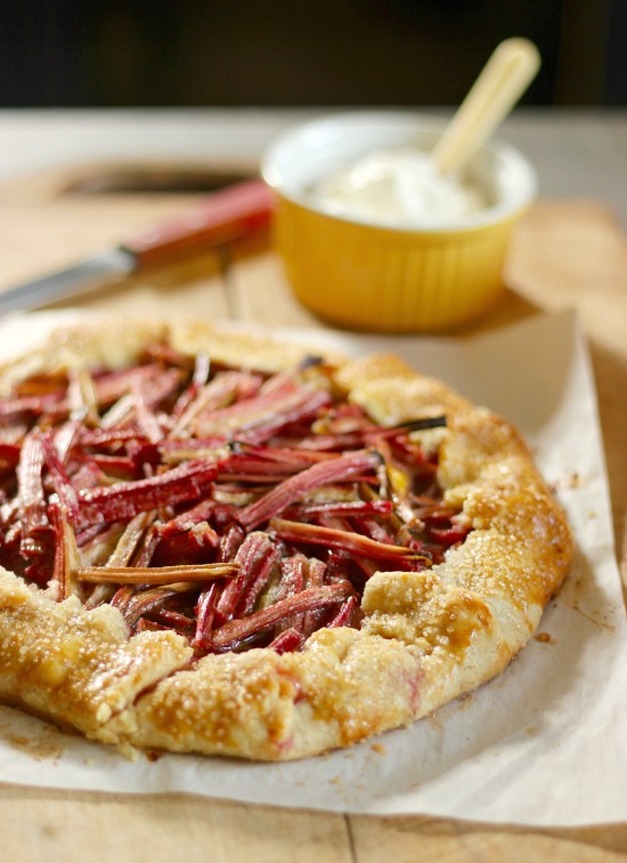 It's a good thing everyone in my family loves rhubarb because lately, it seems that is all that has been coming out of my kitchen. It might be time to change LivingTastefully to The Rhubarb Blog (?)... at least during the spring months. I am very happy to pass this recipe for Rhubarb Galette onto you. For me, galettes have such a wonderful rustic appeal and they are easy to assemble. With a galette, you avoid lining a tart tin with pastry, then lining that with foil and dried beans or rice for a pre-bake (commonly done before filling the shell with custard... or, pastry cream). With a galette, most likely just fruit, mound everything into the center, fold and pleat the edges of the dough, and bake. Easy! There's nothing wrong with syrupy juices bleeding from the crust while baking. In fact, it's somewhat expected. 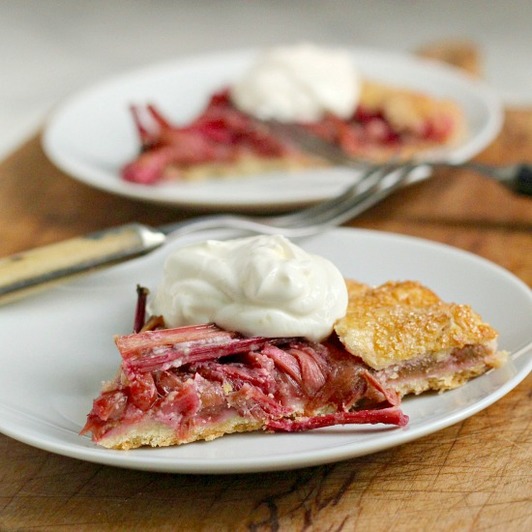 One of my favorite toppings for a fruit galette or tart is organic sour cream with some cane sugar mixed it; tangy and very similar to crème fraîche. Again, easy and so good! 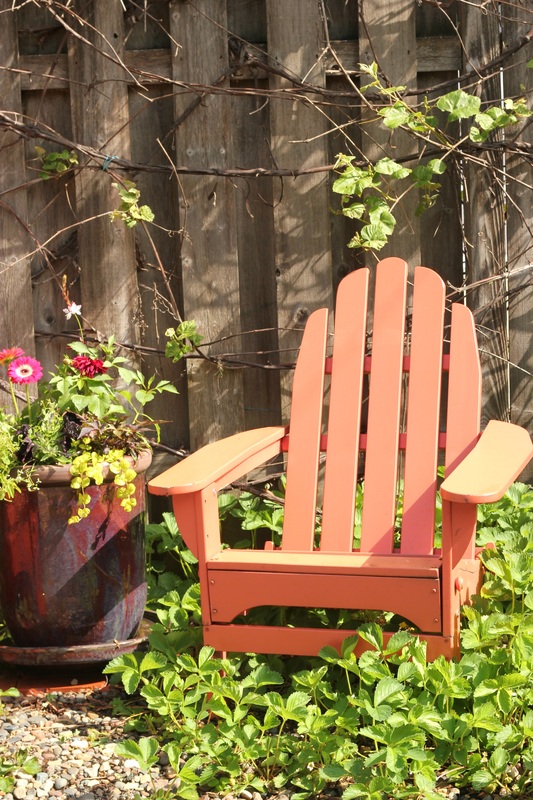 I also thought you might enjoy some early photos of the garden. Most of it has been planted. All of the tomatoes, as of today, are in; something I usually don't do until Memorial Day weekend. But long range forecasts look warm and with rain on the way this week, it will be perfect conditions for the vegetables and herbs. The strawberries surrounding the Adirondack chairs are going crazy! Finally!  This is a photo of my west garden beds. The east side is a mirror image. The chives that we grow were in my mother's garden in Amana, Iowa, where I grew up. I just passed some onto my daughter and her husband for their first garden. In the front raised bed with the newly constructed tuteur, French breakfast radishes edge the outside and nasturtiums will eventually be climbing the frame. 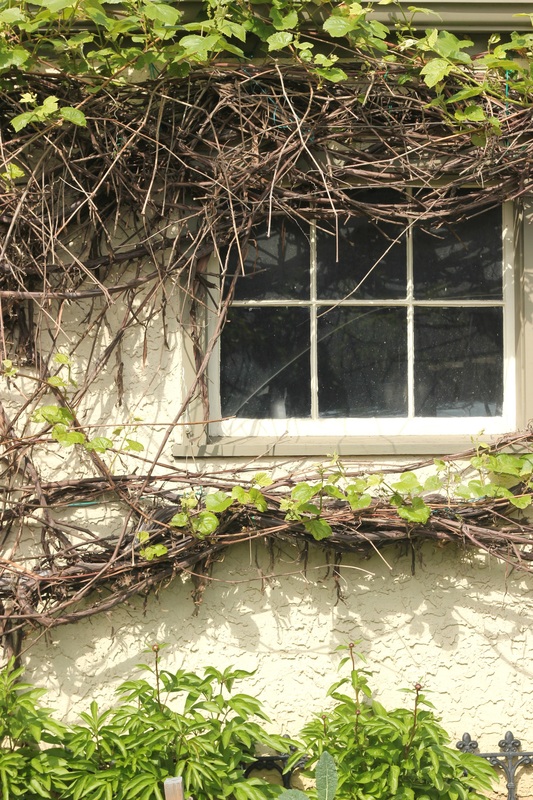 Our University of Minnesota Edelweiss Grapes, along the side of our garage. They also run the length of the backyard fence.  Climbing English peas, purple beans, red onions and French lettuce in the east bed. 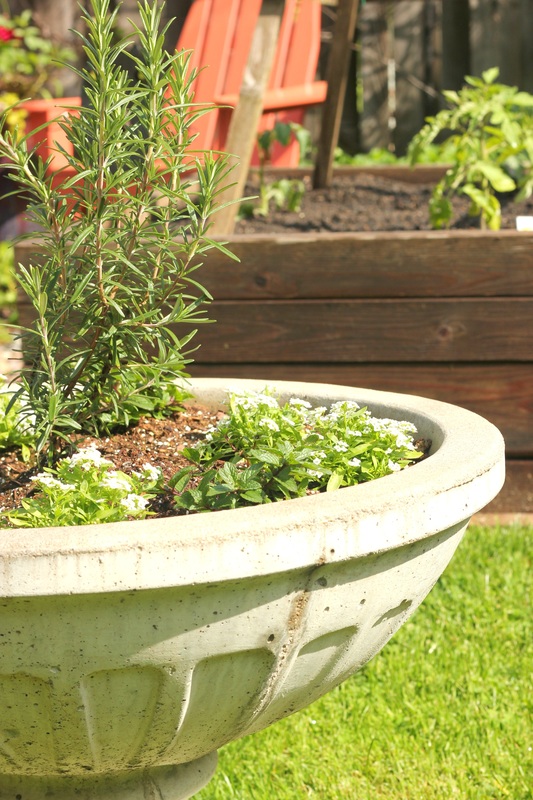 I have two large urns with rosemary in the center and alyssum alternating with either English thyme or mint around the edges. This is the mint, or mojito urn, as I call it. 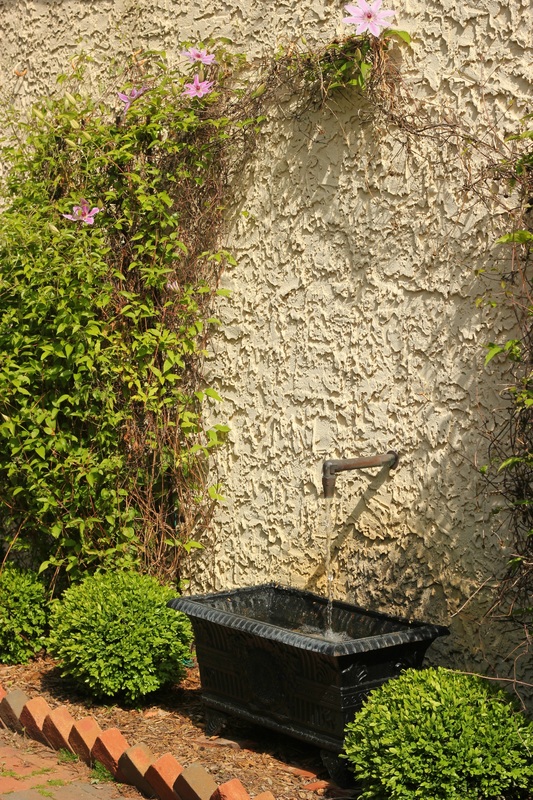 , Our clematis are just starting to bloom. They surround a cast iron, rectangular urn with a bronze water tap that my husband and I assembled for our fountain. One of the best things about summer, for me at least, is hearing the water in the fountain when outdoors... or, through the window of our bedroom at night. I really miss that once we have to close up the patio in the fall.  I have a weakness for plants/blooms that lean toward black. Does that have anything to do with the way I dress? If I were starting from scratch, I could see an entire property in black, white (and green, of course), with a deep red-pink thrown in here or there. Last year I had the most beautiful begonia with black leaves and just a touch of that deep red-pink. I loved that plant and lost it when we were traveling late summer . My fault. And I cannot find it anywhere this year... I'll continue to look.  And that brings me to Bisous... he's been growing into a big, healthy, and dare I say, handsome, young man... which hasn't been easy! He has a penchant for eating anything and everything that can be harmful to a dog. And he does so with a lightening speed determination. We take him on many, many walks during the day. He would prefer being out running in the garden with me, rather than watching from inside. But the times he has been loose out back, it resulted in a (costly) call to poison control after he ate entire marigold plants. After that, gazanias. Throw in the occasional stone, or whirly-birds from the maple tree that showers our yard, patio and deck, and it's constant monitoring of what Bisous will try to devour next. I remember a somewhat similar challenge with Pipi, our previous Frenchie, but any dangerous behavior by her now seems almost nonexistent compared to Mr. B. Bisous is now over 6 months and over 19 pounds. A big boy! And of course, still growing. He's a sweetie and VERY, VERY active.  • adapted from Bon Appetit | April 2010 CRUST: • 1 1/4 cups all-purpose flour • 1 tablespoon sugar • 1/4 teaspoon salt • 7 tablespoons chilled unsalted butter, cut into 1/2-inch cubes • 2 tablespoons (or more) ice water TOPPING: • 1 pound trimmed rhubarb, cut into 2-inch-long, 1/4-inch-thick matchstick-size strips • 1/4 cup, plus 2 tablespoons sugar, divided • 2 tablespoons unsalted butter, cut into pieces • 1 large egg yolk • 1 to 2 tablespoons turbinado (raw) sugar • 8-ounce container organic, full-fat sour cream • 2 tablespoons sugar 1. Pulse flour, sugar, and salt in food processor to blend. Add butter and pulse until it resembles large crumbs. Add 2 tablespoons ice water and pulse until dough clumps together, adding more ice water by teaspoonfuls if dough is dry. Gather dough into a ball; flatten into a disk and wrap in plastic; chill at least 2 hours. 2. Meanwhile, combine rhubarb and 1/4 cup sugar in medium bowl; let stand at least 20 minutes and up to 1 hour. Position rack in center of oven and preheat to 350˚F. Place a large sheet of parchment on work surface; sprinkle parchment with flour. Roll out dough on parchment to a 12-inch round. Transfer dough on parchment to a large, rimmed baking sheet. Drain the rhubarb and mound onto the center of the pastry, leaving a 2-inch border at edge. Gently fold dough border up over outer edge of rhubarb topping. folding and crimping dough to create pleats. Sprinkle 2 tablespoons sugar over rhubarb; dot with butter. Brush dough edges with beaten egg yolk. Sprinkle edges with 1 to 2 tablespoons turbinado sugar. 3. Bake the galette until rhubarb is tender and juices are bubbling, about 1 hour. Cool galette at least 30 minutes. 4. Mix the sour cream and 2 tablespoons sugar in a small bowl. Serve the galette warm or at room temperature with the sweetened sour cream. ENJOY! TAKE a LOOK:  I finally got around to making this colorful dish of Salmon with Rhubarb and Red Cabbage. I have had this recipe squirreled away for years, always running across it when rhubarb season was over and all of my red cabbage had been used up or given to friends. But this time my (rather unorganized) recipe files (found on all three levels of my house) didn't get the better of me. I ran across the recipe at the most opportune time -- when I was again wondering what I should do with all of my rhubarb. Of course, it is far too early to be eating red cabbage from my garden; the plants only went in two weeks ago. But this dish will certainly be on my menu again this summer. I made some slight changes to the original recipe. Instead of roasting the salmon in the oven, it was grilled outdoors on a cedar plank. And assorted garden lettuces were tucked under the tender red cabbage that was simmered in a syrup of orange and spices. I can also see this rhubarb and cabbage served with an herb encrusted pork tenderloin, seared and finished in the oven. So many possibilities. + Grilled Salmon with Rhubarb and Red Cabbage + • adapted from a recipe in Bon Appetit | April 2010 • 4 teaspoons black or yellow mustard seeds • 1 1/4 cups fresh orange juice • 1 cup sugar • 1/3 cup water • 2 tablespoons finely grated orange peel • 4 teaspoons coriander seeds • 1 tablespoon caraway seeds • 1 tablespoon minced peeled fresh ginger • 3 cups 2-inch-long, 1/4-inch-thick matchstick-size strips of rhubarb (from 12 ounces trimmed rhubarb) • 8 cups thinly sliced red cabbage (from about 1/2 medium head) • 1/2 cup Sherry wine vinegar • 1/2 cup dry red wine • 6 6-ounce salmon fillets with skin • 2 tablespoons olive oil • 3 cups assorted lettuces • 3/4 cup plain Greek-style yogurt 1. Stir mustard seeds in small dry skillet over medium heat until beginning to pop, about 3 minutes. Transfer to small bowl; reserve. 2. Bring orange juice, sugar, 1/3 cup water, and orange peel to a boil in a large skillet, stirring until sugar dissolves. Reduce heat to medium; add reserved mustard seeds, coriander seeds, caraway seeds, and ginger. Simmer until syrupy, 10 minutes. Add rhubarb; reduce heat to medium-low. Cover and simmer until rhubarb is tender but intact, 2 minutes. Using a slotted spoon, transfer rhubarb to microwave-safe bowl; reserve. 3. Bring syrup in skillet to a simmer. Add cabbage, vinegar, and wine; bring to a boil. Reduce heat to medium, partially cover, and simmer until cabbage is soft and most of the liquid is absorbed, stirring frequently, about 45 minutes. Season to taste with salt and pepper. Remove from heat. 4. Place salmon pieces on a pre-soaked cedar plank. Brush salmon with olive oil; sprinkle with salt and pepper. Grill salmon over medium-low heat until it is just opague in center. Rewarm reserved rhubarb in microwave just until warm. 5. Divide lettuces among 6 plates or shallow bowls. Scoop cabbage onto the lettuce. Lift the skins off of the salmon fillets and place a fillet atop the cabbage. Spoon a dollop of Greek yogurt onto the salmon; arrange strips of rhubarb on the yogurt. TAKE a LOOK: 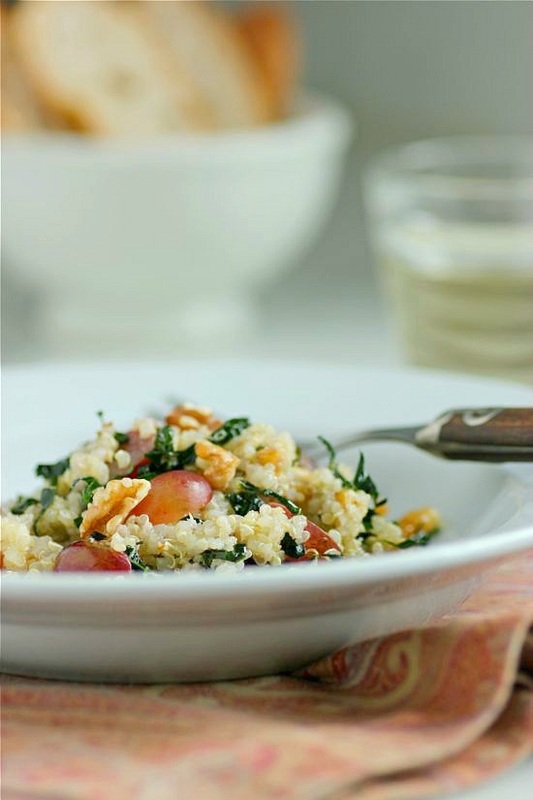 I just made this Quinoa Salad with Kale and Red Grapes ( I still have kale in my garden! ) and I think it could possibly be a contender for one of the sides on my Thanksgiving table. My plans are starting to come together. Our neighbors, that are joining us for dinner this year, are making the turkey, gravy, and mashed potatoes. Yes... it makes it very easy for me. I will fill in with everything else. But I am still undecided on dessert. Of course there will be a pumpkin pie. There has to be a pumpkin pie. But I plan on making a second pie/tart and every suggestion I've thrown out to family members has been vetoed. Maybe I'll stop asking... Maybe I'll make two pumpkin pies. 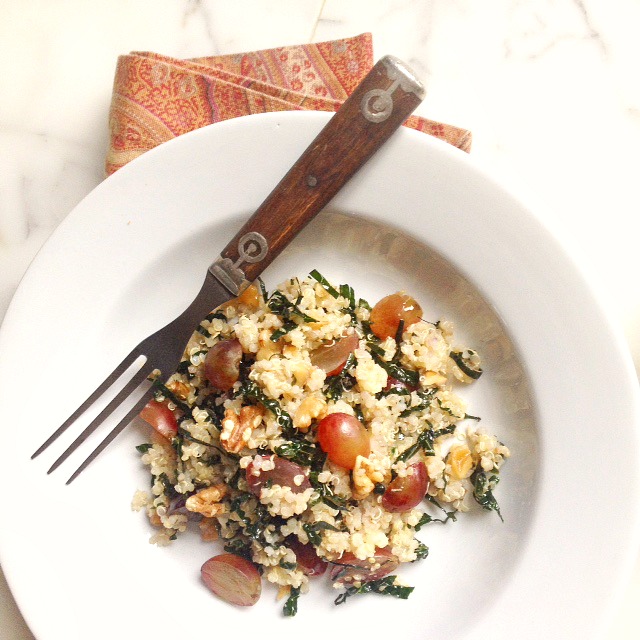  • inspired by a recipe in Experience Life magazine • 1 cup quinoa • 1/2 cup extra-virgin olive oil, plus additional for drizzling • 2 cups water • 3/4 teaspoon kosher or sea salt, divided • 1/4 cup freshly squeezed lemon juice • 1/2 teaspoon ground cumin • Pinch of red pepper flakes • 3 cups stemmed kale, center rib removed and finely juilienned • 1 teaspoon lemon zest • 2 cups halved red seedless grapes • 3/4 cup chopped, toasted walnuts 1. Place the quinoa in a bowl of cool water, and whisk for two minutes, then drain thoroughly in a fine-mesh sieve. Over medium heat, drizzle a small amount of olive oil in a medium-size pot. Add quinoa and stir for one minute to dry and toast briefly. Add the water and 1/2 teaspoon salt, increase the heat and bring to a boil. Reduce heat to the lowest setting, cover pot, and cook for 15 minutes. Remove pot from heat and let stand, covered, for 5 minutes. Fluff quinoa with a fork. 2. While the quinoa is cooking, whisk together the lemon juice, the remaining 1/4 teaspoon salt, ,cumin, red pepper flakes, and olive oil in a large bowl.. Add the kale and press on it for a short time with the back of a wooden spoon. Doing this breaks down its fibers, making it easier to chew and digest. Add the quinoa, lemon zest, grapes, and walnuts; toss gently. Serve at room temperature. TAKE a LOOK: 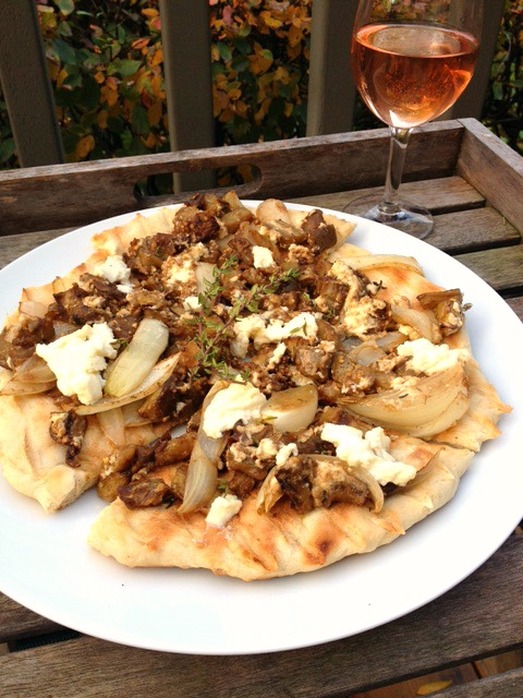 This was the summer of roasted eggplant in my kitchen. I grow eggplant every year, but have never been able to say it reached bumper crop proportions. This time was different. I (almost) had more eggplant than I knew what to do with. And what did I do with it? I made it exactly the same way each time I picked it from my garden. That may sound boring to many of you, but we just couldn't get enough of the roasted eggplant. And when I had visitors from out of town, or friends and family over for dinner, I knew that it wasn't just me loving my pasta tossed with roasted eggplant and onions plus fresh, homemade ricotta stirred into the mix. The recipe was requested by everyone who has eaten it; and making it couldn't be easier. I was raised on eggplant. My mother grew classic eggplant in her garden and like me, prepared it only one way. She sliced the eggplant thinly, dipped the slices in beaten eggs and cracker crumbs, and followed by frying in vegetable oil. I could be wrong... but I don't remember anything else on the dinner table those nights. My mother just kept filling our plates with the freshly-made, hot fried eggplant, and we devoured it. For many years I just roasted my cubed eggplant with onions and fresh thyme, then tossed with hot pasta, a dousing of extra-virgin olive oil and topped it all with grated Parmigiano- Reggiano. That was it, and it was good. But this has also been the summer of homemade fresh ricotta. That addition is what changed everything... along with a hefty drizzle of a good quality balsamic, as suggested by friend and blogger Stacey Snacks. Last night I changed it up a bit. Instead of tossing the eggplant and onions with pasta, I topped a pizza on the grill with the vegetables and ricotta. I also changed the way I usually make my pizza dough (recipe HERE), which resulted in the best grilled pizza I have ever made. I'm hoping for some decent weather down the road so I can continue to experiment with the grilling of the dough. First of all, I forgot to add a bit of honey to the proofing yeast, although I don't know if that made a difference. Sugar is often added to yeast and water to help the process along. I also --always-- refrigerate the balls of dough for a time until I begin the pizzas, usually later in the day. This time, I took the room temperature, beautifully soft yeast dough, instead of refrigerating it, and immediately began stretching into a round, then tossed it onto the hot, gas grill. It was over the top perfect. My husband kept describing it as pastry. There was no bready doughiness. It was delicate, crisp, and shattered like the leaves of puff pastry in a croissant... spectacular. However you use the roasted eggplant, though, I can guarantee you'll love it also.  + The ingredients below are approximate. Feel free to mix it up the way you like it. I use enough fresh-cubed eggplant to totally cover a large baking sheet with 1-inch sides. And don't be stingy with the extra-virgin olive oil! • 1/2 - 3/4 pound fresh ricotta, purchased or homemade (recipe HERE) • 3-4 smaller classic eggplant or 6 Japanese eggplant (see above), peeled if using Classic Eggplant, and cut into 1-inch cubes • 1 very large yellow onion cut into 1-inch wedges, and wedges kept intact • Extra-virgin olive oil • Kosher or sea salt and freshly-ground pepper • Fresh thyme sprigs • Good quality balsamic vinegar 1. Preheat oven to 375˚F. In a large bowl, toss the eggplant with enough olive oil to lightly coat and a sprinkling of kosher or sea salt. Spread the eggplant in a single layer onto a baking sheet with 1-inch sides and transfer to oven. Roast eggplant, tossing occasionally, until it begins to soften. Place the onion wedges in the bowl and drizzle with olive oil to lightly coat; sprinkle with salt. Add the onions, along with any of the oil remaining in the bowl, to the eggplant. If the mixture seems dry, drizzle with additional oil. Continue to roast the eggplant and onions, gently tossing often for even caramelization. Once the onions are added, watch closely. I like the onions soft with a bit of color. Avoid burning the onions or they will become bitter. Keeping the wedges intact as much as possible during roasting helps with that. Right at the end you can start breaking up the onion into pieces. I never watch the clock when making this. Individual ovens make differently. I prefer a gentle roast at 375˚, tossing often, and watching closely to avoid any burn. 2. When roasted to your liking, remove from oven and transfer to a large mixing. Add a good drizzle of the balsamic and leaves from the fresh thyme sprigs; adjust salt and add freshly-ground pepper to taste. Gently stir in as much fresh ricotta as you like. My feeling is, there can never be too much. Toss mixture with hot pasta (adding a little more olive oil if needed), use on pizza, or top crostini. It's endless... TAKE a LOOK: 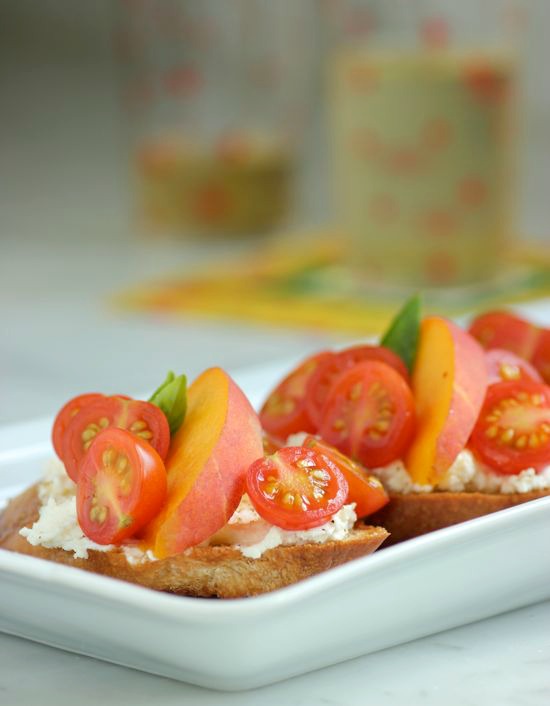 I've been trying hard to make the most of what is left of a Minnesota summer. And that means spending as much time as possible on the patio with family and friends, eating end- of-the-season fruits and vegetables. This week I've been serving up Olive Oil Toasts with Peaches, Cherry Tomatoes and Fresh Ricotta. A platter of these plus a glass of crisp white wine is all I need to be content. Just don't do as I did... When my husband asked me this morning what I was grilling, I realized I never turned off the burners on the gas grill last night. What was I thinking? Or maybe I should rephrase that... Why wasn't I thinking? 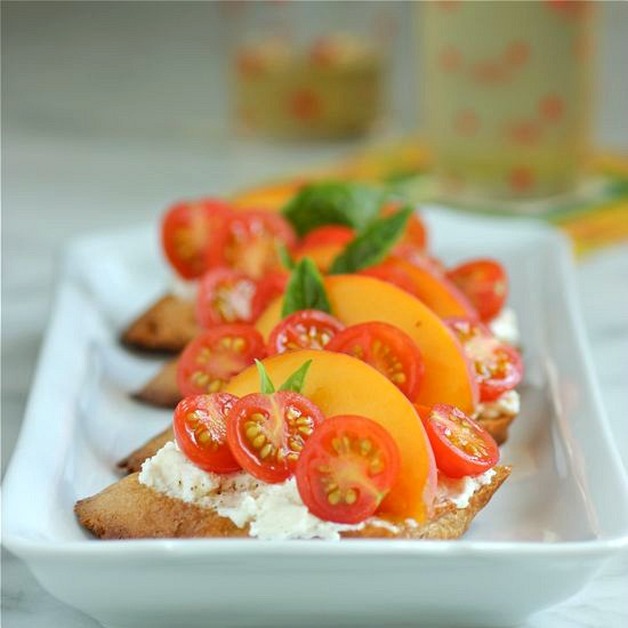  • Baguette slices, angular cut approximately 1/2-inches thick • Extra-virgin olive oil • Sea salt • Fresh ricotta • Freshly ground black pepper • Peaches, cut into thin wedges • Cherry tomatoes, preferably heirloom, halved • Fresh basil 1. Lightly brush both sides of the baguette slices with olive oil. Grill the slices over medium-low heat until golden. Remove and sprinkle sea salt over the grilled bread. 2. Spread the baguette slices generously with fresh ricotta, Sprinkle the ricotta lightly with freshly ground pepper. 3. Gently press peaches and cherry tomatoes onto the ricotta and garnish with basil. 4. Enjoy summer!! TAKE a LOOK: |


Categories
All
|